History
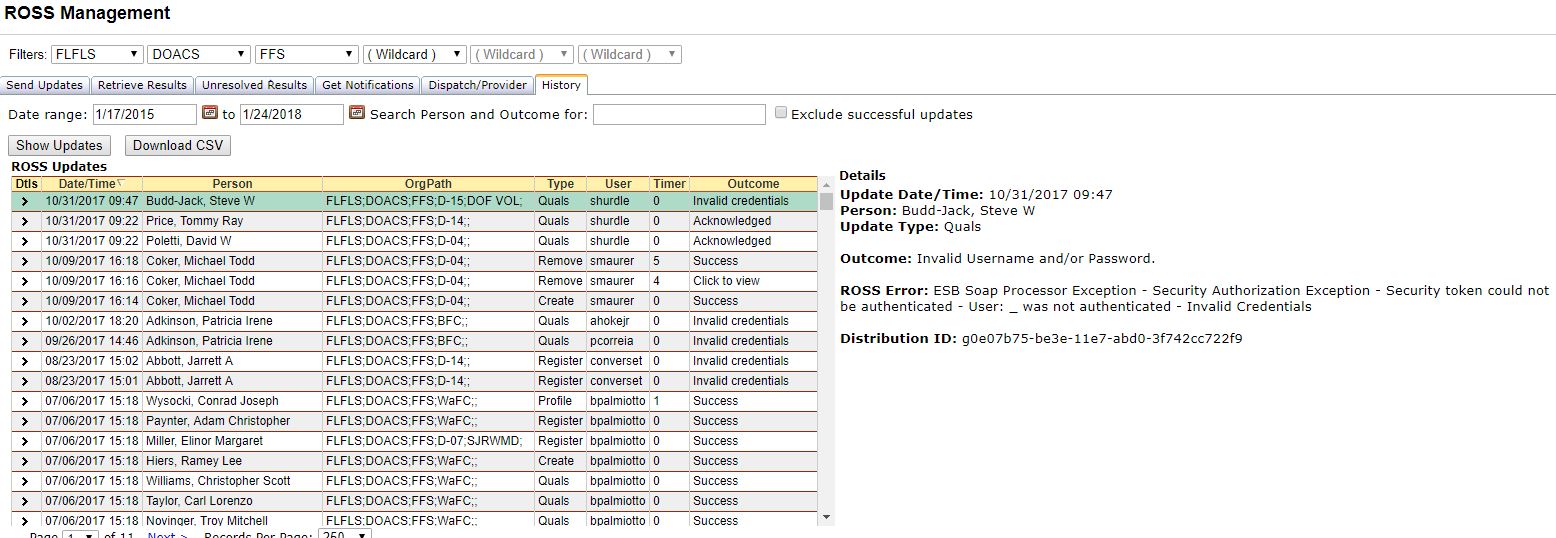
The History tab allows the user to view and download a list of the updates that have been sent to ROSS for a period of time. The IQS program logs all the transactions with ROSS including errors. The interface allows the user to search for transactions by a date range, by a person or by the outcome of the transaction. The information that is logged and available through the History tab can be used to analyze the frequency and cause of persistent errors that may occur in the ROSS – IQS interface and aid in fixing those problem areas. The History tab also provides organizations a record of their ROSS transactions.

The History tab displays each transaction by:
-
Date/Time: the data and time that the transaction was processed.
-
Person: the IQS/ROSS person who was being processed.
-
OrgPath: the Organization to which the person belongs.
-
Type: the type of update that was sent from the “Send Updates” tab.
-
User: the ROSS username of the person who sent the update.
-
Timer: the seconds that elapsed before the transaction was either successful or an error occurred.
-
Outcome: the result of the update. “Success” means the transaction was processed with no errors. Other outcomes indicate an error was received from ROSS.
-
Details: Select a record by clicking the arrow on the far left of that person’s record in the grid to view the details for that person. The exact error message received from ROSS is displayed in the “Message” section of the details. The “Outcome” also contains a more detailed description than what is listed in the grid.
NOTE: Left clicking the mouse on any of the column headings will allow the user to sort within that column ascending or descending order.
Steps to Show Updates on the History Tab
- Set the filter at the top of the page to the organization for which you want to perform your search.
- To display all updates that have been logged with no search criteria, leave all values blank for date range and search criteria and click the “Show Updates” button.
- To search for updates during a date range, use the calendar icon to select a “from” and a “to” date. Once you have entered the dates, click the Show Updates button. All the updates that have occurred for the date range and organizational filter criteria will be displayed in the grid.
- To search for all updates for an individual resource, enter a unique part of their name in the “Search Person and Outcome for:” box. Clear the dates in the Date Range if you do not want the date range also applied to the name search.
- To search for all updates for a particular outcome, enter a unique part of an Outcome in the “Search Person and Outcome for:” box. Clear the dates in the Date Range if you do not want the date range also applied to the outcome search. For example, entering “Not authorized for dispatch” will return a list of all updates that resulted in an error where the user did not have access to the persons dispatch center for which they were trying to update.
- To only see updates that were NOT successful, click the check box to the left of “Exclude successful updates”.
Steps to Download a ROSS Updates History File
- Set the filter at the top of the page to the organization for which you want to perform your search.
- Enter your search criteria to display a list of records that you want to download and click the “Show Updates” button.
- Click the Download CSV button. A File Download dialog box will be displayed.
- Select Open to view the CSV (comma separated value) file. The file will open in Microsoft Excel.
- Select Save to save the file to a local drive. After clicking Save, you can navigate to the location where you want to save the file. The file has a default name of “ROSS_Updates_month_Year.csv”. You can change the name in the Save As dialog box by typing a different name in the File Name.
- The downloaded file contains all the information displayed in the grid and also the GUID, RCID and Tag for each person.

