
Start IQSweb and Log in.
Left click ROSS Management/Import Experience menu option.
Click Browse to select a file to import. In the Choose File window, navigate to the ROSS Assignment History to report that you saved from the ROSS Cognos reports interface. Click Open.
Click the Import button to read the file contents in the IQSweb.
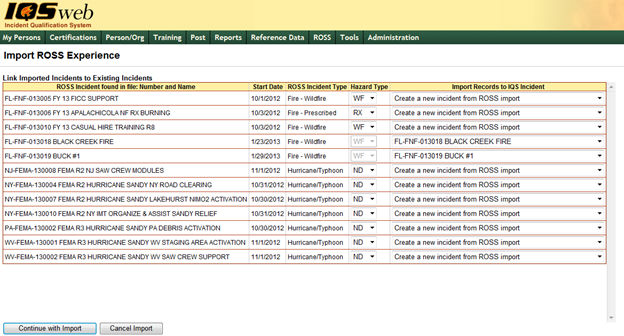
Displayed on this screen are the ROSS Incident Number and Names, Date, ROSS Incident Type, IQS Hazard Type and if applicable the IQS Incident Name. Review the incident list and the IQS Hazard Type assigned during the import process. If needed, click on the Hazard Type drop down box to select a different hazard type for the incident which will work more effectively with your personnel’s qualifications. For example, wildfire pre-position orders import from ROSS as All Hazard (AH) incident hazard type. The IQS manager may wish to change the hazard type to WF so that job experience can be recognized.

The column Import Records to IQS Incident is used to indicate if the incident will be a new incident created in IQSweb, or if it is an existing incident that you have already created. If the Incident number in the file matches an incident that already exists in IQSweb, that incident will be displayed. You can also select an incident that you want from your existing IQSweb incidents. You may want to do this if you have already created the incident in IQSweb with a slightly different name and number.
Note: ROSS does not contain incident data for size class, fuel type and management level, so you will need to edit new incidents imported from ROSS if you want to record this information.
Click Continue with Import at the bottom when you have finished your selections on the page.
Click Cancel Import to cancel any import operations and return to the file selection option at the beginning.

Set the filter values for the organization to which you would like to import experience. The contents of the file are read based on the values you have selected in the Filter.
Note: there may be more records in your file that do not meet the organization filter you have selected. Use all wildcards to read the entire file.
Review the list of persons displayed in the grid. Click the check box in the Select column to select or de-select a person for import. Use the Select All and Clear All buttons at the bottom of the grid as appropriate.
The Status column indicates if the record is being imported for the first time. A value of New means this record has not been previously imported. A value of Update, means this record has previously been imported. An update will overwrite a previously imported record.
The Job Code column displays the job and hazard type each person was assigned in ROSS. The IQS manager has the option to use the drop-down list  and select another job code/hazard type combination from their IQS reference data.
For each person, select an Evaluation value from the drop-down list. If no value is selected the default value will be “N” meaning no evaluation.
For each person, you can optionally enter text in the Quality field and add to the Comment field.  By default a comment is added to the experience record that includes the Incident Type and Request number as recorded in ROSS.
Click Import Selected Experience at the bottom when you have finished your selections on the page. Click Cancel Import to cancel any import operations and return to the file selection option at the beginning.
Click Cancel Import to cancel any import operations and return to the file selection option at the beginning.
If you imported the selected experience, once the operation is complete, you will be returned to the file selection screen. A message at the top of the page will indicate the number of records that were imported successfully. Click the View the Import Log link to open the log file containing details of the import.

The log file opens a report in a separate window. The log file lists the records that were successfully imported and also those that were contained in the file, but not imported. The Result column gives information pertinent to every record contained in the file. For example, if currency is not maintained for the person, that information is listed in the result column. The report may be several pages long. Reference the Import Experience Technical Notes for more details on how the ROSS codes are mapped to IQS and also why some records in the file may not be imported. Users may wish to save or print the file, if it is lengthy so they can rectify any issues indicated in the report.

After successfully importing records from ROSS, check the incident records and experience records for individuals imported from the file to make sure the data was accurately imported and make any changes or additions needed.